
You can add a timer to any item on your website. This goes for your whole website on Cyber Monday or a single, sad pair of leftover boots. Either way, the effect is the same: a timer improves conversions dramatically and increases sales.
Most countdown timers online help with board games or in-office team-building sessions. They take up the whole screen and only work on the website where you originally found them. Others offer code solutions you can add to your website, looking pretty much the same for everyone.
In the article below, we'll show you how you can create a countdown timer for website campaigns of any scale. How you can accommodate your website's unique brand voice using Zoom Engage's many- customization and personalization functionalities.
How to Make a Timer
On the Zoom Engage (ZE) platform, you'll usually get to start with a blank slate. In this case, however, we took care of appropriate copy and design choices ourselves. We built the campaign you see below within several minutes, using the platform's rich vault of stock photos, fonts, letter spacing, and other design options.
The purpose of starting with a finished, albeit in-platform design is to draw the entirety of your attention to the website countdown timer as a single, most important functionality.
Check out the
Powerful selling text and stunning visuals are essential for any email campaign. Here is one more element to incorporate into your communication — the countdown timer. Its effectiveness has been proven countless times. When used properly, it can drastically improve conversions and increase sales. Countdown timers instantly make a point, telling customers to act immediately to get what they need.
Emphasize the sense of urgency and increase conversions in just 4 steps:
Step 1: Write Your Copy and an Effective CTA
The sheer complexity and effort needed for creating an effective copy and CTA are only rivaled by its brevity. For this simple exercise in campaign design, we used the example of a weekend sale. The "WEEKEND FLASH SALE" copy explains the purpose of the countdown. The discount that's about to expire is only usable over the weekend. The SHOP NOW button underlines the whole point of the discount, which is increasing sales. This is a solid foundation.
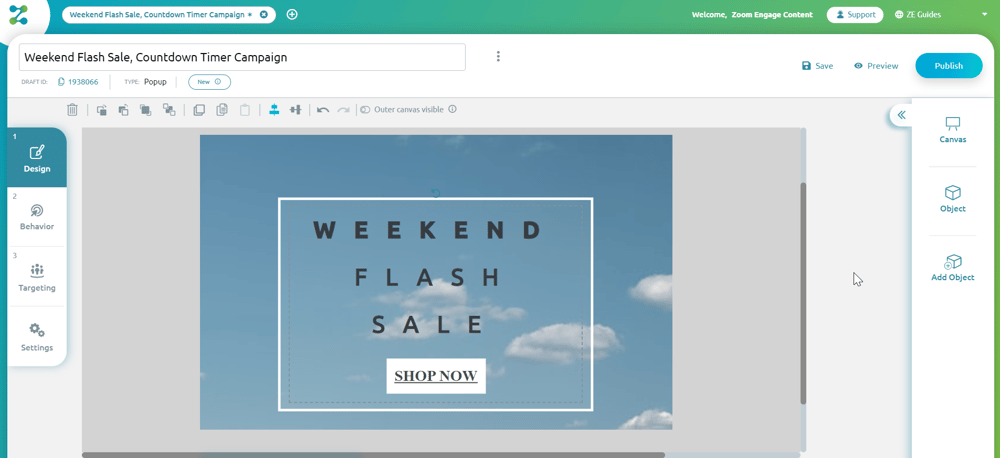
Image 1: Step 0
Step 2: Add Object
When you take a look at the ZE platform's screen, you'll see plenty of potential functionalities. The options to your right have to do with design choices, the first, highlighted option above the settings, targeting, and behavior. To locate the countdown timer option, you need to click "Add Object."

Image 2: Step 1, Add Object
Step 3: Special
Once you clicked Add Object, you should look at the newly opened drop-down menu, and hit SPECIAL. As you can see, this is also where you can add text, images, buttons, and forms to the campaign.
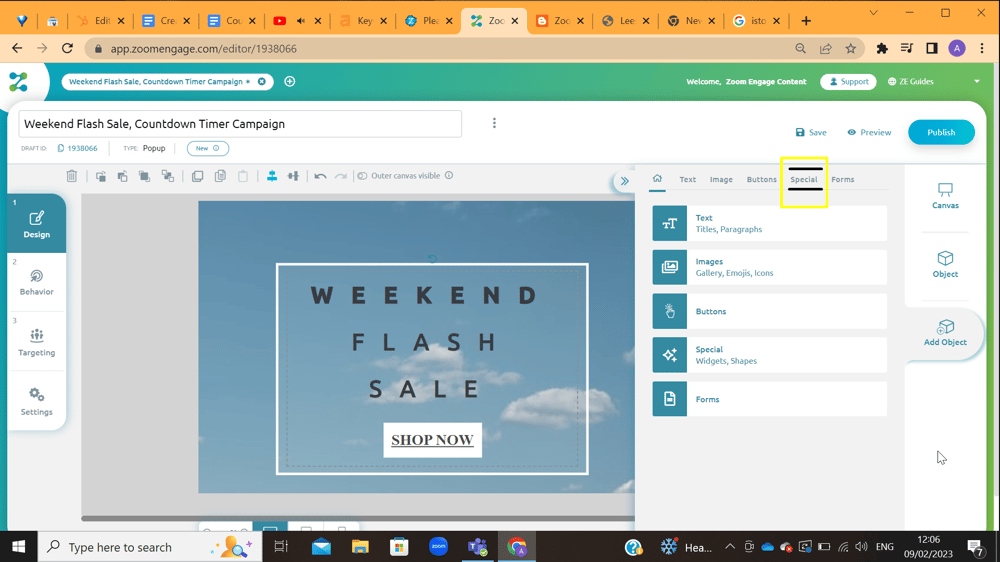
Image 3: Step 2, Special
Step 4: Flip Clock or Timer
In the SPECIAL menu, you can find many features such as background effects, scratch cards, and the object container. Skim through all that, and take a look at the Flip Clock and the Timer. The flip clock is more complex and would work better with this kind of campaign. The Timer, on the other hand, has limited functionalities, more suitable for small-scale items. If you are unsure about whether you should use the Flip Clock or the Timer, you can ask ZE's dedicated Customer Success Manager to advise you.
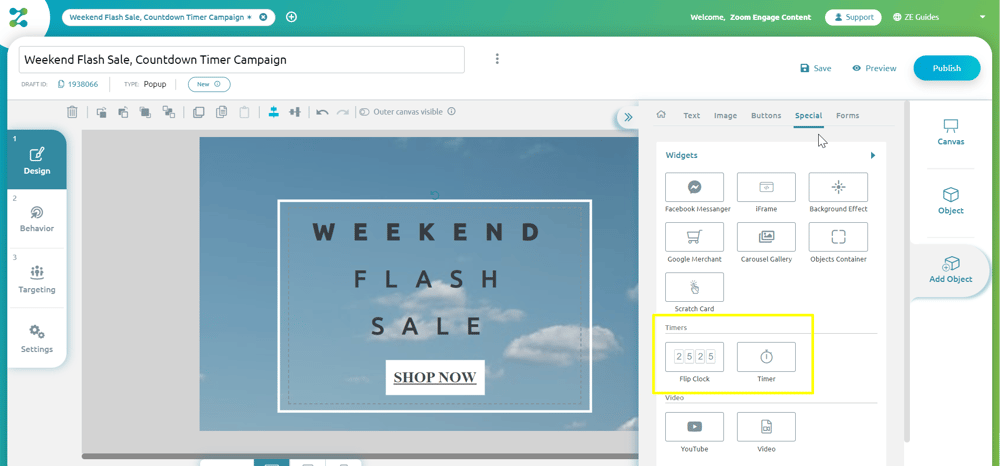
Image 4: Step 3, Flip Clock vs. Timer
Step 5: Drag and Drop the Online Countdown Timer
A simple drag-and-drop motion is all you need to add the counter to your website. As all of ZE's campaigns are on-site campaigns, there are so many ways you can include the timer on your website. You could create a CTA button with a timer attached. You could add it to the header. In this case, we are using a regular popup.
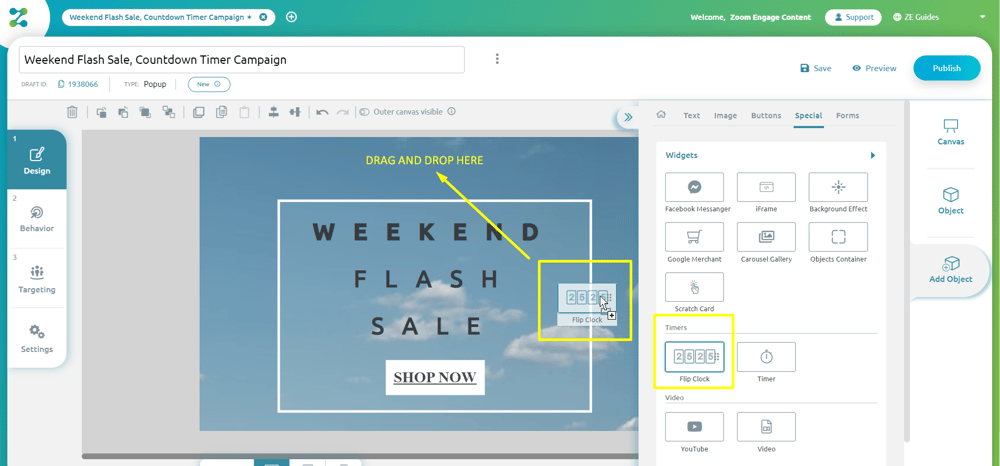
Image 5: Step 4, Drag and Drop
Step 6: Adjust The Timer Size
This step is pretty simple, as you can use your cursor to adjust the precise size of your clock countdown timer. We left a bit of empty space at the top of the canvas to include the timer, nd we tried to make it big enough for users to see.
Keep in mind that, since the number of seconds on the countdown timer switches so often, it's bound to draw the user's eye.

Image 6: Step 5, Adjust Flip Clock Size
Step 6: Adjust the Timer Position
You can put the timer pretty much anywhere as long as it lines up with the popup's core message: SHOP NOW, or the time will run out. If you want everything to pop into place just the right way, ZE has your back. All you need to do is center the timer element, as you can see in the image below.
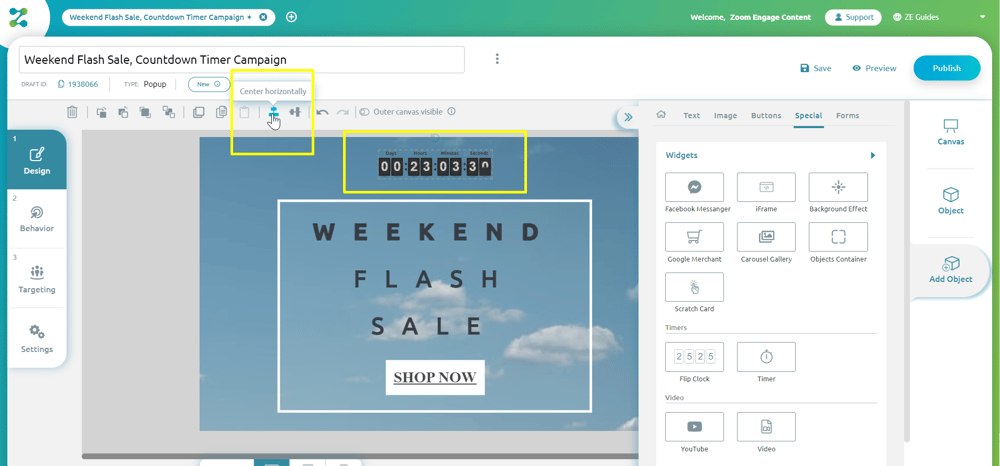
Image 7: Step 6, Adjust Flip Clock Position
Step 7: Click on the Timer to Reveal the Timer Menu
Now that you've added the timer to the popup and adjusted its size and position, it's time to decide how far ahead you want to plan.
Click the timer itself, you will see a menu. It shows you the day countdown timer as well as the ones that include only hours and minutes. You can include a 5-min countdown timer, or even a 10-minute countdown timer, as long as it fits the CTA and the marketing plan. Since we want to set the date, we're choosing the Day Counter.
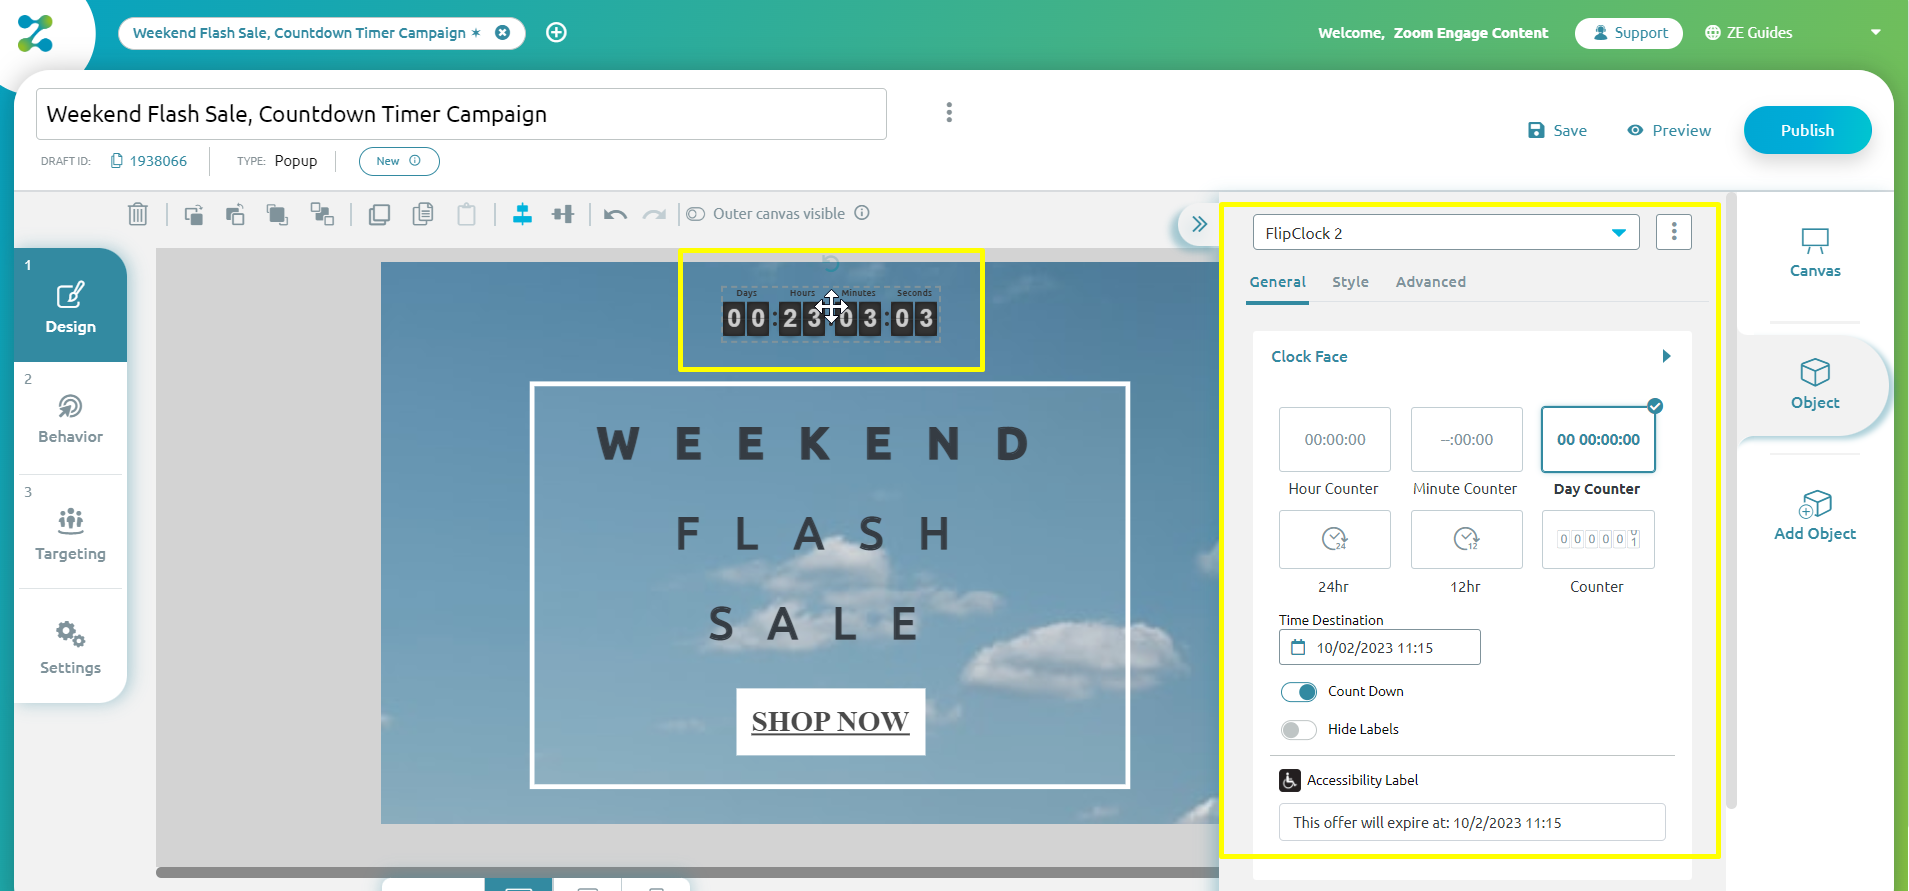
Image 8: Step 7, Click the Countdown Menu and Check Out the Menu
Step 8: Set The Date, Hour, Minute, and Second! Vol. 1
We even plan for spontaneity these days, especially if we own a business! Therefore, it would be advisable to set the weekend timer ahead of time. To do this, simply click the "Time Destination," like in the image below.
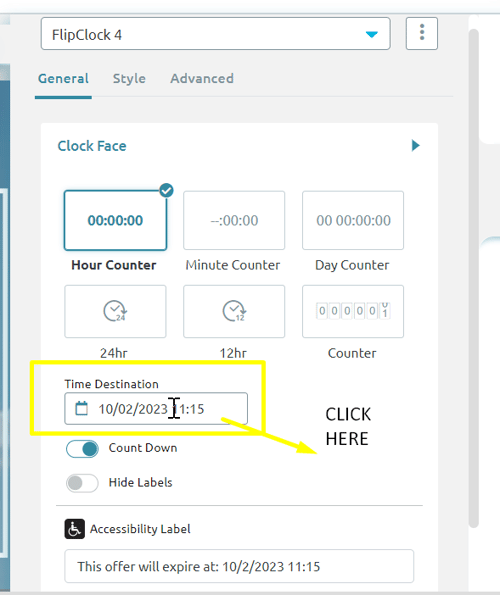
Image 9: Step 8, Click Time Destination
Step 9: Set The Date, Hour, Minute, and Second!, Vol. 2
Once you have clicked the Time Destination option, you can find the weekend you want, and start counting the days, hours, minutes, and seconds! Adjust the date and the time the way it's done in the image below. You can use the Time menu. However, if you want a more detailed number, you can add the digits manually.
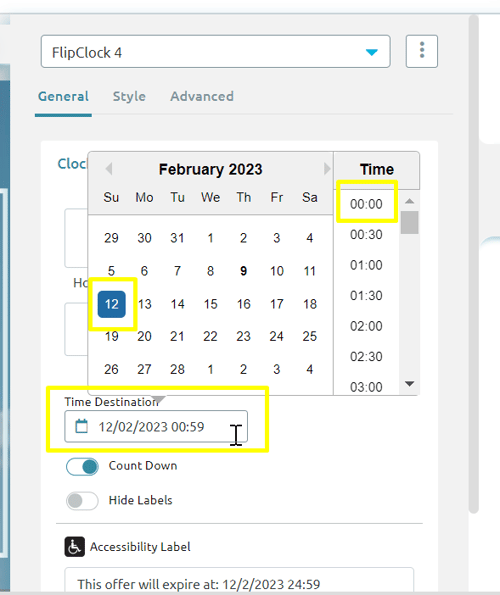
Image 10: Step 9, Adjust the Day, `Hours, Minutes, and Seconds, If Applicable
Step 10: Preview
That's all, folks. All you need to do now is check out what the whole thing looks like put together, once it's live on your website. Before it goes live, of course. Just to be safe with every choice we made thus far, we'll check out the Preview option you can see in the image below. If you want to make any last-minute changes before the campaign goes live, now is your chance!
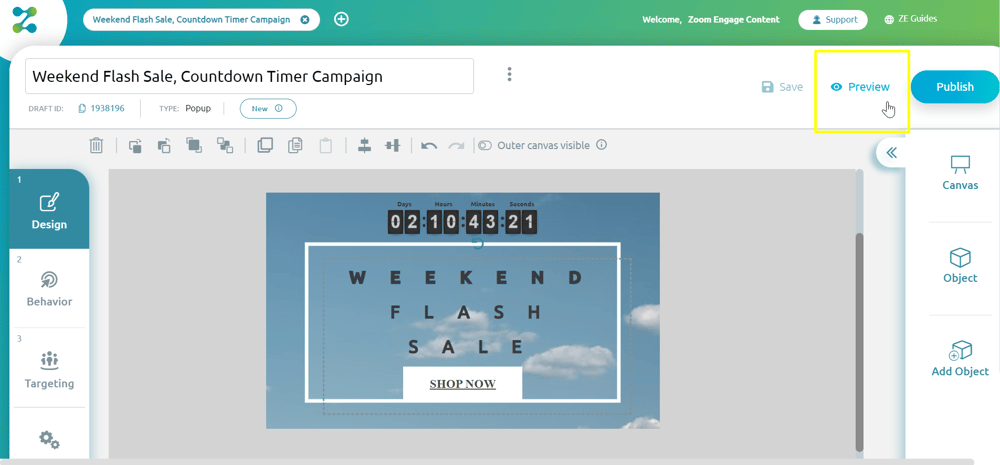 Image 11: Step 10, Click Preview
Final Words
Decide on the type of countdowns you want to use first. Then write up the copy and the CTA button for the specific campaign you want for your website. It could be a Valentine's Day sale or a specific product you want to get rid of to make room for a new collection. If you need help, ZE does not only provide a DIY campaign-building platform. You also get to work with an experienced CSM, and a whole team of technical staff, to help you out with any additional concerns.
The work ZE can do for you is highly personalized, and any popup, timer, or carousel you add to your website can fit your brand voice like a glove. Schedule a demo, and find out exactly what Zoom Engage can do for you.